
Kids and teens · Relaxation skills for ages 5 to 12 · Updated 2026-11-05
Progressive muscle relaxation script for kids: a read aloud script, a 5 minute version and a free printable
Ready-made printable: Mindfulness Worksheets for Kids and Teens Holiday 20% off: about $9.20, was $12 (EUR 10) · instant digital download
Buy on Etsy
When a child is worried, angry or wound up, the body joins in. Shoulders creep up toward the ears, fists clench, the jaw gets tight and the tummy feels like a knot. Progressive muscle relaxation (PMR) teaches children to notice that tension and let it go, one part of the body at a time. It is simple, it needs no equipment, and kids usually enjoy it because it feels a bit like a game.
This guide is for school counselors, therapists, teachers and parents of kids about 5 to 12. It includes a full read aloud progressive muscle relaxation script for kids (about 12 to 15 minutes), a short 5 minute version, a 1 minute "secret squeeze" for the classroom, tips for different settings, the cautions that matter, and an honest look at what the research does and does not show. At the end there is a free three page printable: Relax Script Cards, My Relax Body Map and a Relax Practice Tracker.
Jump to the free progressive muscle relaxation printable · Jump to the full script
What progressive muscle relaxation is
Progressive muscle relaxation is a way of relaxing the body by gently tightening a group of muscles, holding for a few seconds, and then letting go while you notice the difference. You move through the body in order, usually from the hands and arms to the face, shoulders, belly, legs and feet. The word "progressive" simply means you progress from one muscle group to the next.
The idea of tensing first can sound odd. Why squeeze if the goal is to relax? Two reasons. First, most of us, children included, do not notice mild tension until it is pointed out. Squeezing on purpose makes the feeling of "tight" very clear, so the feeling of "loose" afterward stands out by contrast. Second, a muscle that has just been tensed tends to let go more fully when it is released, a bit like a pendulum that swings further after you pull it back. Over time, the child learns to recognize early tension and release it without the squeeze at all.
For kids, the steps are wrapped in pretend play: squeezing a lemon, pulling into a turtle shell, scrunching a nose at a fly. The pictures help children remember which muscles to use, keep them engaged, and give them a quick mental shortcut they can use later at a desk or in the car.
Where PMR comes from
Progressive relaxation was developed by the American physician and physiologist Edmund Jacobson, who studied muscle tension in the early twentieth century. He published Progressive Relaxation with the University of Chicago Press in 1929, with a second edition in 1938, and a popular book, You Must Relax, in 1934. Jacobson's original method was long and slow, with many muscle groups practiced over many sessions.
Later clinicians made it shorter and easier to teach. Joseph Wolpe used a shortened version as part of systematic desensitization, described in his 1958 book Psychotherapy by Reciprocal Inhibition. In 1973, Douglas Bernstein and Thomas Borkovec published Progressive Relaxation Training: A Manual for the Helping Professions, which standardized a 16 muscle group procedure and showed how to shrink it to 7 groups and then 4 groups once a person has learned the skill. That idea, starting long and getting shorter with practice, is exactly what the 5 minute version later in this guide is based on.
For children, the best known adaptation is a 1974 article by school counselor Arlene Koeppen, "Relaxation Training for Children," in Elementary School Guidance and Counseling. She turned each muscle group into a short story: a lemon to squeeze, a lazy cat stretching, a turtle hiding in its shell, a fly landing on your nose. Those images have been retold and adapted in schools and clinics ever since, and the Coping Cat program for anxious children, developed by Philip Kendall and colleagues, describes using a lemon squeezing style script adapted from Koeppen. The script in this guide is written fresh for Lotus & Tulip. It keeps a couple of the classic images because children already know and love them, and adds new ones.
What the research says (honestly)
PMR is one of the most widely taught relaxation skills, and it has a reasonable evidence base. It is worth being clear about what that evidence covers.
- Relaxation training can lower anxiety. A 2008 meta-analysis by Manzoni and colleagues in BMC Psychiatry pooled 27 studies of relaxation training (including progressive relaxation, autogenic training, applied relaxation and meditation) and found a medium sized reduction in anxiety. Most participants were adults, and the authors noted large differences between studies, so the result is encouraging but not specific to children.
- Relaxation is a supporting skill in child anxiety treatment, not the main ingredient. Cognitive behavioral therapy for anxious kids usually teaches relaxation early, then moves on to changing worried thoughts and gradually facing fears. In an analysis of the large Child/Adolescent Anxiety Multimodal Study (CAMS), Peris and colleagues (2015) found that improvement sped up once cognitive restructuring and exposure practice were introduced, while relaxation training on its own had limited impact on the overall course of anxiety.
- Practice matters. In the Manzoni review, longer training and home practice were linked with bigger effects. One session is a nice moment of calm; regular practice is what builds a skill.
- A few people feel more tense, not less. Heide and Borkovec (1983) described "relaxation induced anxiety," where focusing inward makes some people more anxious. It is uncommon in a classroom, but it is the reason the cautions section below matters.
The practical takeaway: PMR is a good, low risk calm body tool that helps kids notice tension and settle their bodies, especially before sleep, after a hard moment or before something stressful. For a child with an anxiety disorder, it works best as one part of a plan that also includes brave steps, not as a way to avoid every uncomfortable feeling. If you are supporting an anxious child, the anxiety worksheets for kids guide explains the rest of that plan.
When to use a muscle relaxation script with kids
- At bedtime. Many children find it easiest to fall asleep after a slow body relaxation. Lying down works well here, and you can let the script end in sleep instead of "open your eyes."
- Before something stressful. A test, a performance, a dentist visit, a sports game or the first day at a new school.
- After a big feeling has passed. PMR is not for the peak of a meltdown. Once the child is calmer, it helps the body finish settling.
- As a class transition. After recess, gym or lunch, a 3 to 5 minute version helps a room shift into quiet work.
- In counseling sessions and small groups. As a skill lesson, a session opener or a closing ritual.
- For kids who carry stress in their bodies. Children who report tummy aches, headaches or tight shoulders when they are worried often connect well with body based tools. Physical symptoms should still be checked by a doctor first.
Before you start: setting up
- Practice when the child is calm. A skill learned while calm is far easier to use later when stressed. Teach it first on an ordinary day.
- Choose a position. Sitting in a chair with both feet on the floor and hands resting on the lap is easiest at school. Lying on the back on a mat or bed works well at home.
- Eyes can stay open. Invite children to close their eyes or look softly at one spot on the floor. Never require eyes closed. Some children, especially those who have been through frightening experiences, feel safer with their eyes open.
- Gentle squeezes, not hard ones. For kids, ask for about half strength: "Squeeze just enough to feel it, not enough to hurt." Hold for about 5 seconds, then release and rest for about 10 to 15 seconds.
- Keep breathing. Remind children to keep breathing normally while they squeeze. Holding the breath is a common mistake.
- Use your voice. Read slowly, a little softer than usual, with pauses. The pauses are where the relaxing happens.
- Silliness is fine. Giggles in the first session are normal, especially in groups. Laugh with them, then invite them to try again. It usually settles by the second or third round.
Full progressive muscle relaxation script for kids (read aloud)
This script takes about 12 to 15 minutes at a relaxed pace. Words in brackets are instructions for the reader, not lines to read. Each muscle group is done twice. If time is short, do each one once.
Getting ready
"Today we are going to practice a way to help our bodies feel calm and loose. It is called muscle relaxation. Our muscles are the parts of the body that help us move, and sometimes when we are worried or upset, they get tight without us noticing. We are going to squeeze some muscles on purpose, just a little, and then let them go, so we can feel the difference between tight and loose.
"Get comfortable in your chair. Put both feet flat on the floor and let your hands rest on your legs. You can close your eyes, or you can look at one spot on the floor. Either way is fine. Let's take one slow breath in through your nose... and let it out slowly through your mouth. Good."
1. Hands: the lemon squeeze
"Imagine there is a big, juicy lemon in your right hand. Squeeze it, just enough to get some juice out. Feel your fingers and your hand working. Keep breathing. Squeeze... squeeze... [about 5 seconds] ...and drop the lemon. Let your hand go soft and floppy. Notice how your hand feels now. Maybe warm, maybe tingly, maybe heavy. [pause about 10 seconds]
"Now a lemon in your left hand. Squeeze... feel the tightness... [5 seconds] ...and let it drop. Let your fingers go loose. Notice the difference between squeezing and letting go." [pause, then repeat both hands once more]
2. Arms: superhero muscles
"Now let's pretend you are a superhero showing off your strong arms. Bend your elbows and make your arm muscles firm, like you are flexing. Not too hard. Feel your arms working. Hold it... [5 seconds] ...and let your arms flop down onto your legs like cooked noodles. Let them be heavy and loose. [pause]
"One more time. Superhero arms... hold... [5 seconds] ...and noodle arms. Feel how loose they are now."
3. Shoulders: the turtle shell
"Now you are a turtle, and you want to hide in your shell. Slowly lift your shoulders up toward your ears, as if you are pulling your head into your shell. Feel your shoulders get tight. Hold... [5 seconds] ...now come out of your shell. Let your shoulders drop all the way down. Feel them get heavy and soft. [pause]
"The coast is clear, but let's practice once more. Into your shell... hold... [5 seconds] ...and out. Let your shoulders melt down. Ahh."
4. Forehead: the surprised owl
"Next, you are an owl who just saw something very surprising. Raise your eyebrows way up high, so your forehead gets wrinkly. Hold that surprised owl face... [5 seconds] ...and let your forehead go smooth. Let your eyebrows rest. [pause]
"Once more. Surprised owl... hold... and smooth. Feel how calm your forehead is."
5. Eyes and nose: the bunny nose
"Now pretend you are a bunny sniffing a flower. Scrunch up your nose and squeeze your eyes a little, so your whole middle face wrinkles. Hold the bunny scrunch... [5 seconds] ...and let it go. Let your cheeks and eyes relax. [pause]
"One more bunny scrunch... hold... and relax. Notice your whole face getting soft."
6. Jaw: the sticky taffy
"Imagine you are chewing a big, sticky piece of taffy. Bite down gently and feel the muscles in your cheeks and jaw get tight. Gently, we are not trying to hurt our teeth. Hold... [5 seconds] ...and let your jaw go loose. Let your mouth open just a tiny bit, and let your tongue rest. [pause]
"One more gentle bite on the taffy... hold... and let go. Feel how nice a loose jaw feels."
7. Back: the tall tree
"Now sit up tall like a tree. Gently pull your shoulders back, as if you are trying to hold a pencil between your shoulder blades. Feel your upper back squeeze. Hold... [5 seconds] ...and let go. Let your back settle softly into the chair. [pause]
"Once more, tall tree... squeeze your shoulder blades... hold... and relax. Let your back be comfortable."
8. Belly: the drum tummy
"Now we are going to make your tummy firm like a drum. Tighten your belly muscles, as if someone is about to tap on your tummy drum. Keep breathing. Hold... [5 seconds] ...and let your tummy go soft. Let it rise and fall as you breathe. [pause]
"Again. Drum tummy... hold... and soft tummy. Put a hand on your belly if you like and feel it move as you breathe."
9. Legs: the gas pedal
"Now imagine you are driving a race car, and your feet are on the gas pedals. Press your feet down into the floor and feel your leg muscles get firm, from your thighs down to your calves. Hold... [5 seconds] ...and take your feet off the pedals. Let your legs go loose and heavy. [pause]
"One more lap. Press the pedals... hold... and let go. Feel your legs resting."
10. Toes: warm sand
"Last one. Pretend you are standing on a beach with warm sand under your feet. Curl your toes down into the sand, gently, and feel the squeeze in your feet. Hold... [3 to 5 seconds] ...and spread your toes and let them relax. [pause]
"Once more. Curl your toes into the sand... hold... and let go. Feel how your feet are calm and still."
The whole body: floppy rag doll
"Now your whole body is relaxed. Let's check. Your hands are loose... your arms are heavy... your shoulders are down... your face is smooth... your jaw is soft... your back is comfortable... your tummy is soft... your legs and feet are resting. You are as floppy as a rag doll.
"Take a slow breath in... and out. As you breathe out, think of a calm word, like loose, calm or soft. Say it quietly inside your head. [pause] This feeling is something you can make yourself, any time. The more you practice, the easier it gets.
"In a moment we will finish. Wiggle your fingers... wiggle your toes... take a nice stretch if you want... and when you are ready, open your eyes or look up. Well done. You just practiced relaxing your whole body."
At bedtime, skip the wake up ending. Instead say: "Stay as floppy as a rag doll, and let your body sink into the bed. You do not need to do anything else. Just rest."
Short 5 minute PMR script for kids
Once a child knows the full script, use this shorter version. It follows the same idea as the shortened adult procedures: fewer, bigger muscle groups, done once each.
- Arms and hands, lemon squeeze plus superhero arms. "Squeeze lemons in both hands and make strong superhero arms at the same time. Hold... and let them go floppy like noodles."
- Face, owl and bunny. "Raise your eyebrows, scrunch your nose, and bite gently on the taffy, all at once. Hold... and let your whole face go smooth."
- Shoulders, back and belly, turtle tree drum. "Lift your shoulders into your turtle shell, sit up tall, and make your tummy a drum. Hold... and let it all melt down."
- Legs and feet, gas pedal sand. "Press your feet into the floor and curl your toes into the sand. Hold... and let your legs rest."
- Rag doll check. "Take one slow breath. Think your calm word. Notice your whole floppy body."
Hold each squeeze for about 5 seconds and rest for 15 to 20 seconds in between. With pauses, this takes about 4 to 5 minutes.
The 1 minute secret squeeze
Once kids are good at relaxing, they can use a single image quietly, without anyone noticing. That is the goal of the secret squeeze. Teach it after a few practice sessions of the full or short script.
- Notice where your body feels tight right now. Hands? Shoulders? Jaw?
- Give that one spot a small, quiet squeeze for 3 seconds (a lemon under the desk, a tiny turtle shrug).
- Let it go and breathe out slowly.
- Think your calm word.
The secret squeeze works well before a test, in line at the cafeteria, during a car ride or before speaking in class. Pair it with a slow breath from the breathing exercises for kids guide for an even stronger reset.
Muscle relaxation for kids by age
Ages 4 to 6
Keep it short and playful: 3 or 4 muscle groups, one round each, lots of movement and big pictures. Demonstrate every squeeze yourself, because young children copy far more than they follow words. Lying on the floor as a "sleeping animal" works well. Expect wiggles. Two minutes of real practice is a success at this age.
Ages 7 to 9
Most children this age can follow the full script with the reader modeling. They enjoy choosing their own pictures, so invite them to invent images for each muscle group. Start using the My Relax Body Map so they learn where they hold tension.
Ages 10 to 12
Older kids may find the animal images babyish. Keep the same steps but use plain or sporty language: "make a fist," "shrug your shoulders," "press your feet into the floor like you are bracing for a jump." Explain the reason behind it, because tweens like to know why. They can start using the short version and the secret squeeze on their own, and some like a recording to use at night. For teens, see the coping skills worksheets for teens.
How to teach progressive muscle relaxation to kids, step by step
- Explain tight and loose. Show the difference with a demonstration, such as a stiff robot arm compared with a floppy noodle arm, and explain that worry and anger can make muscles tight without us noticing.
- Check for injuries or pain. Ask whether anything hurts today and skip or soften any body part that is sore or injured.
- Set up a calm space. Choose sitting or lying down, dim the lights if possible, and let the child keep eyes open or closed.
- Model each squeeze. Do every step with the child so they can copy you, using about half strength.
- Read the full script slowly. Hold each squeeze about 5 seconds and pause 10 to 15 seconds after each release so the child can notice the difference.
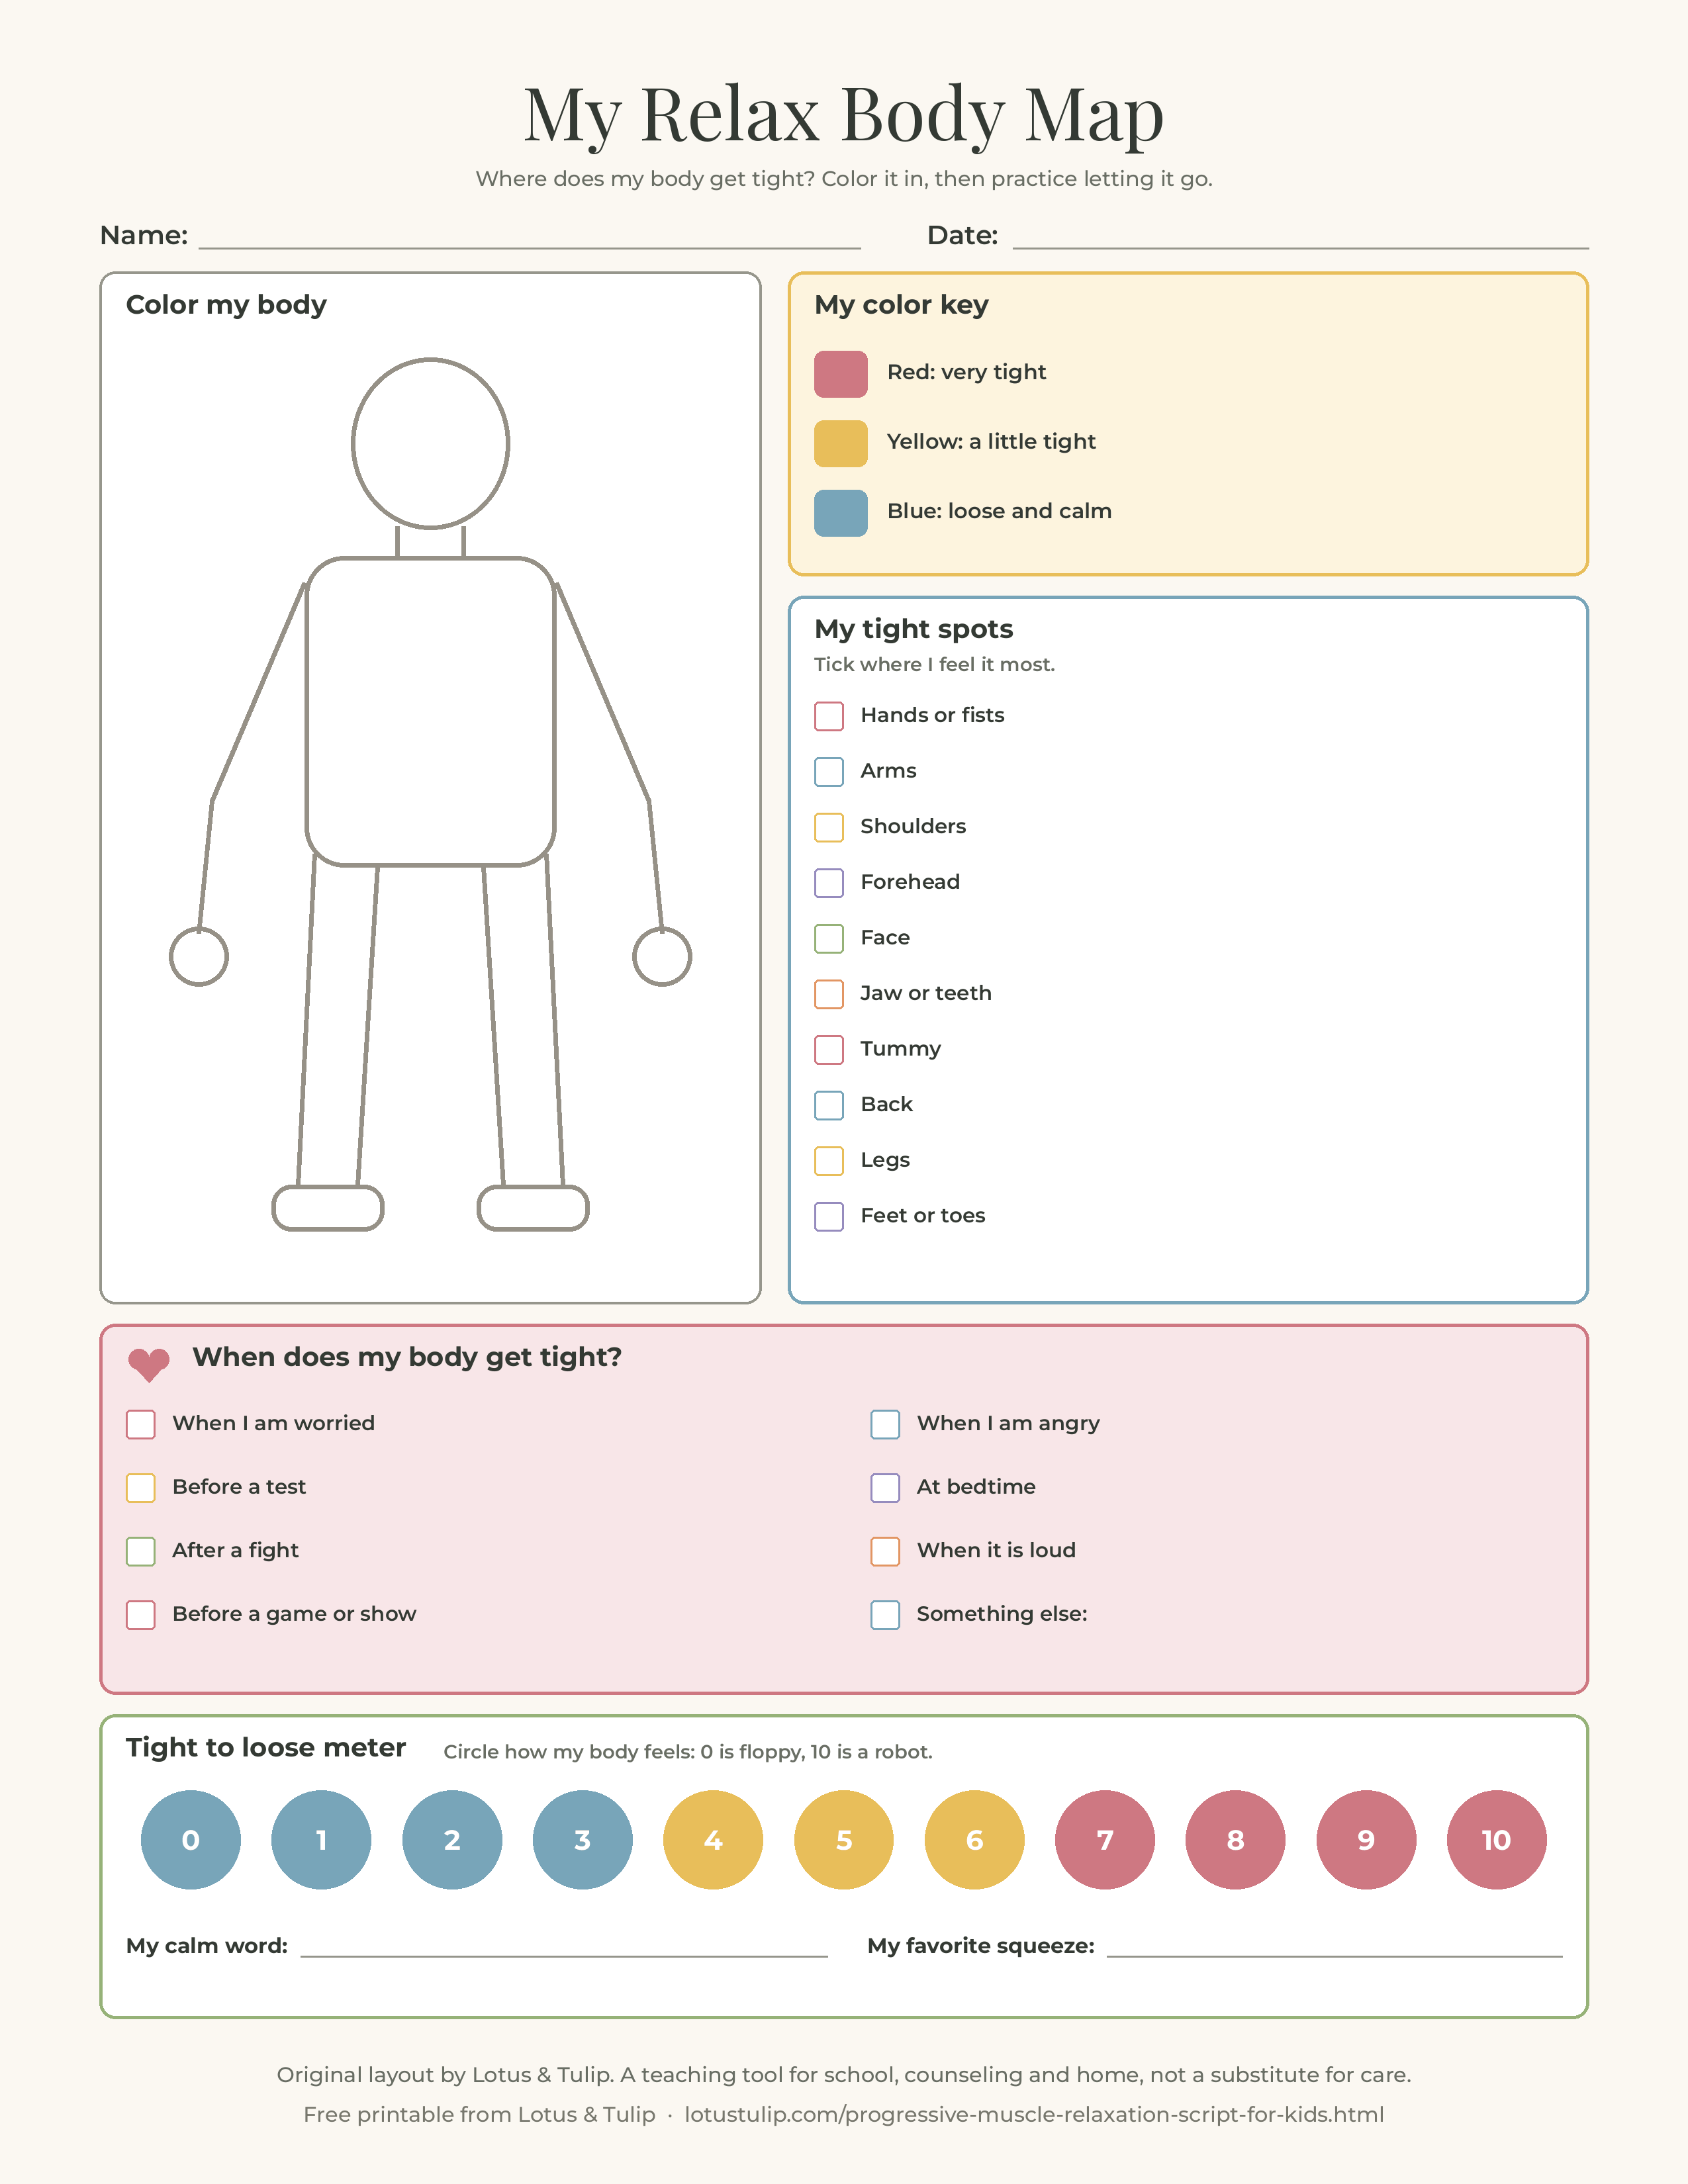
- Ask what they noticed. Afterward, ask which body part felt most different and use the My Relax Body Map to mark where they usually feel tight.
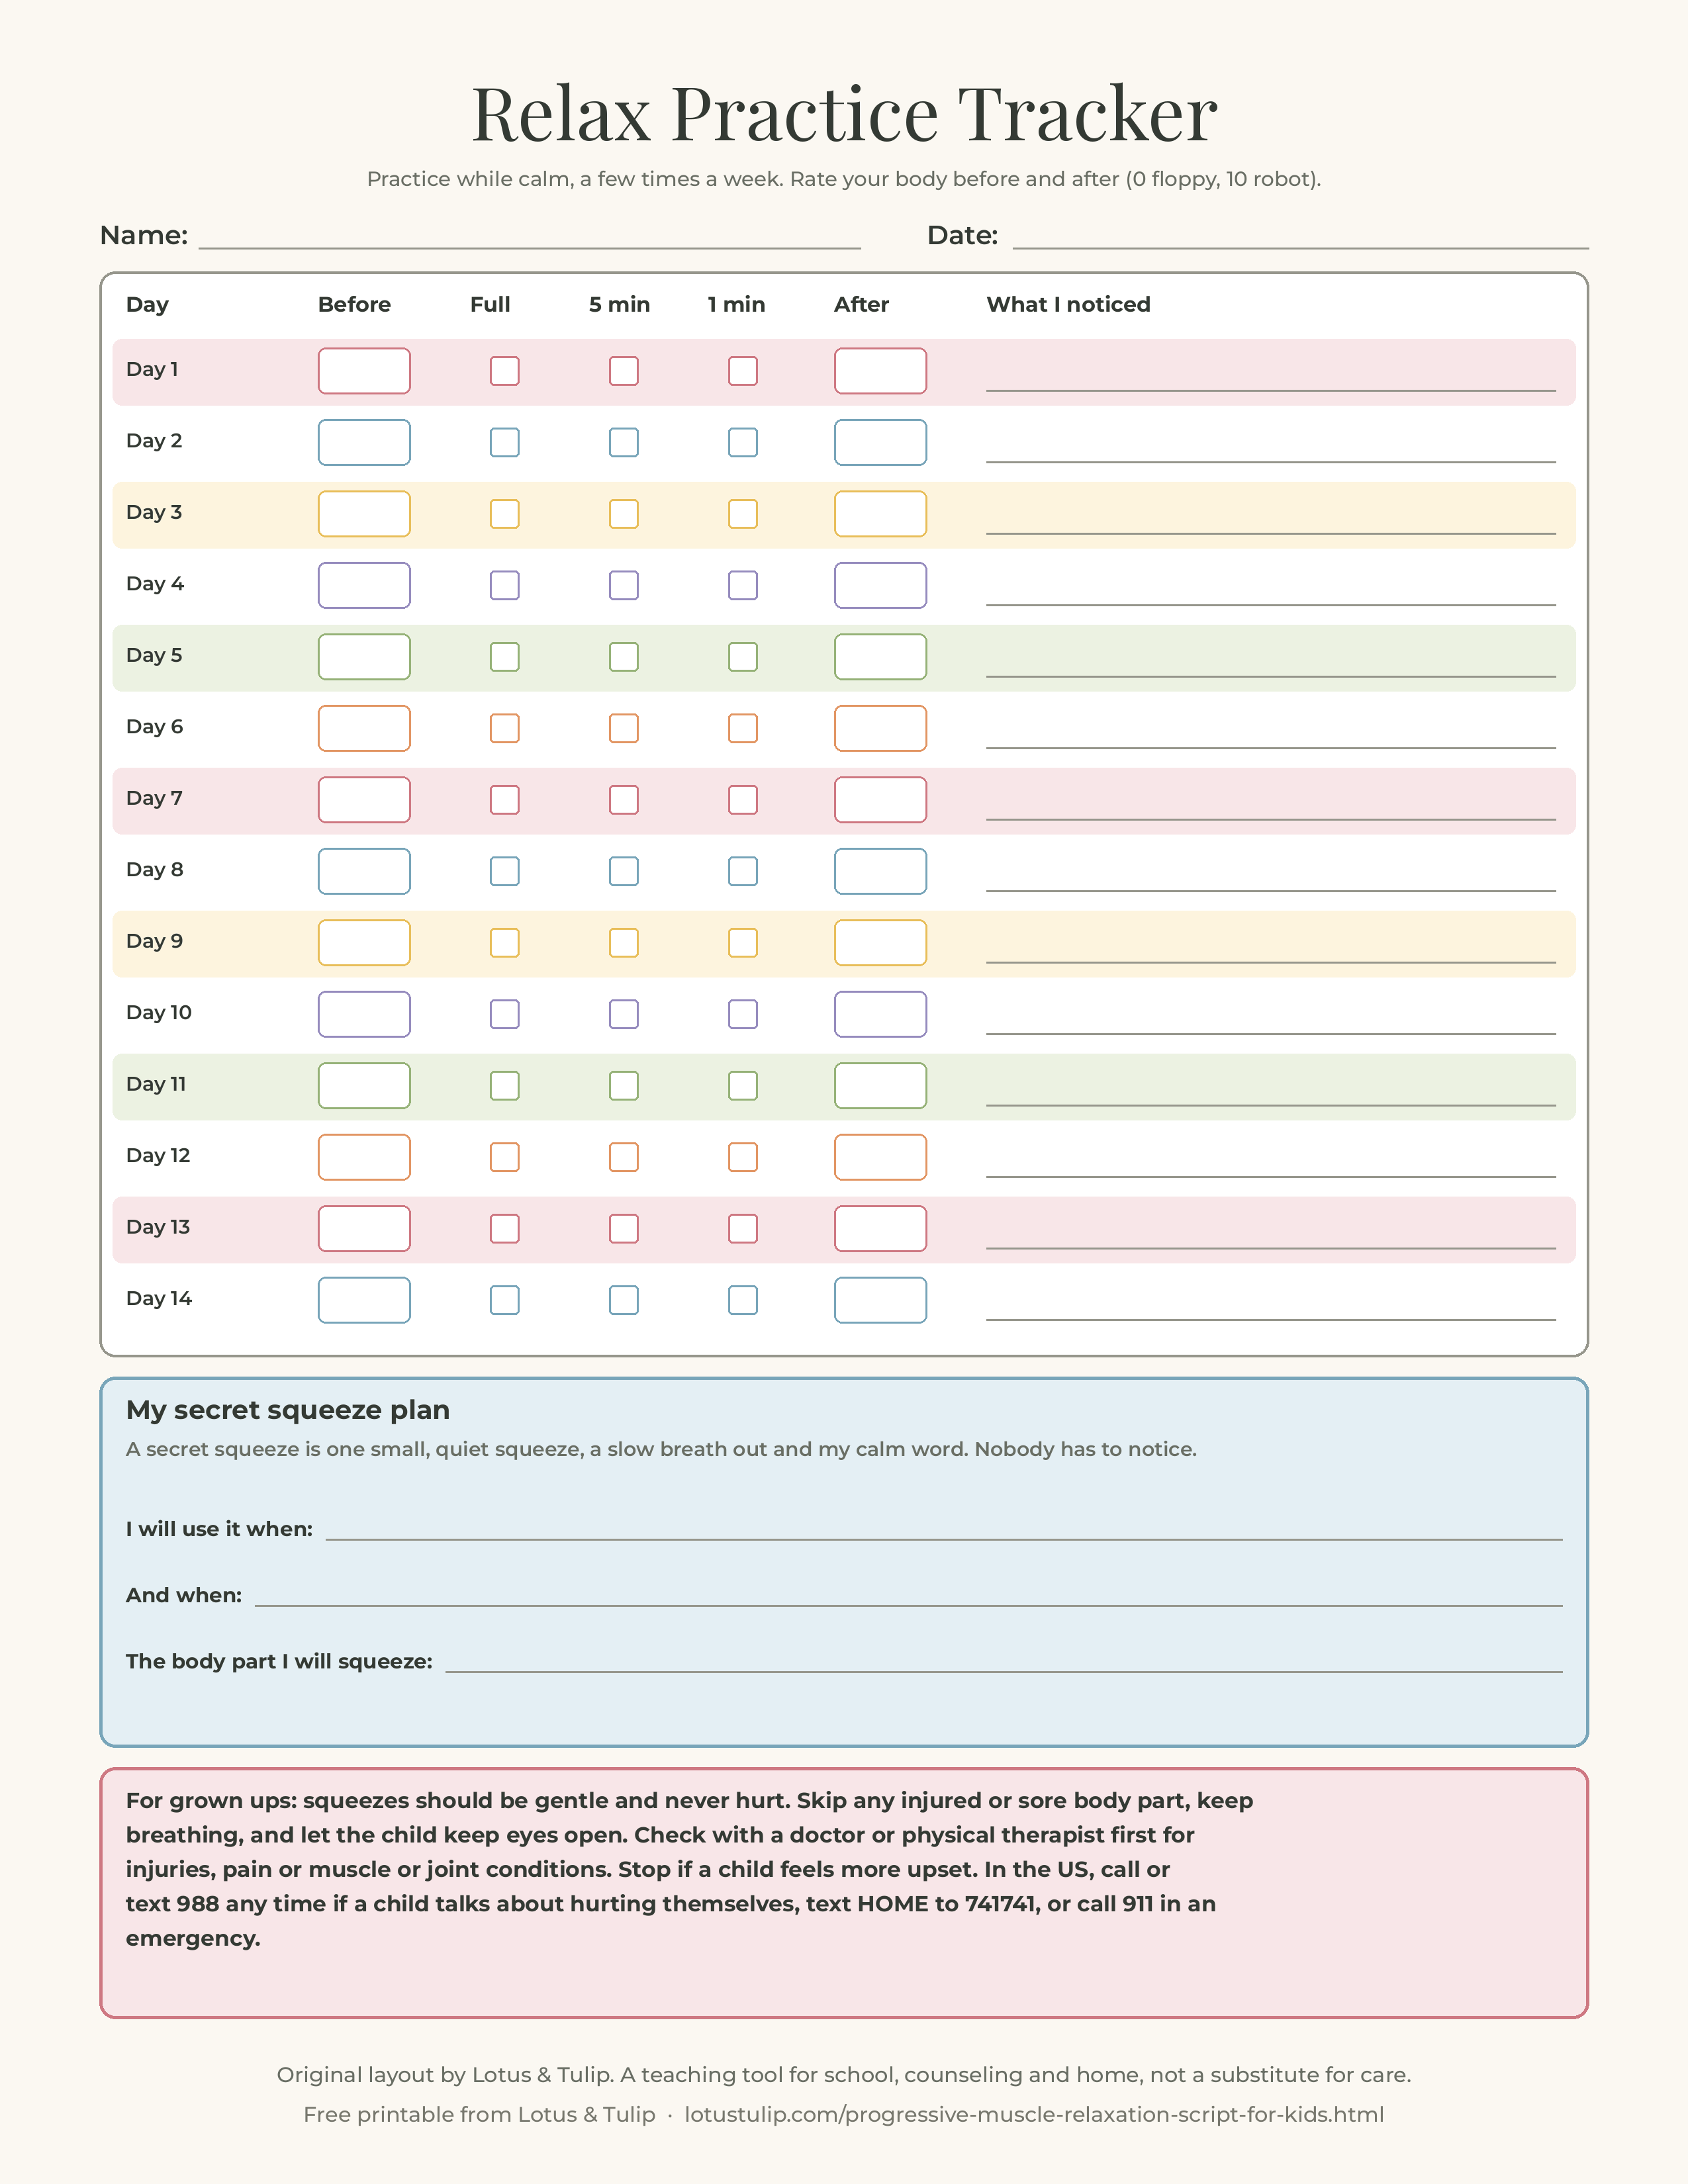
- Practice regularly while calm. Aim for a few times a week, for example at bedtime or the start of a session, and track it on the Relax Practice Tracker.
- Shorten it as skill grows. Move from the full script to the 5 minute version, then to the 1 minute secret squeeze.
- Plan when to use it. Help the child name two or three real moments, like before tests or at bedtime, when they will use their relax skill, and praise them when they try it.
Tips for school counselors, teachers and parents
School counselors and therapists
- Teach PMR in a skill session early, then open or close later sessions with the 5 minute version so it becomes automatic.
- Pair it with a body clue lesson. Children who can say "my shoulders get tight when I am nervous" have a built in cue to start relaxing.
- Record yourself reading the script, with the family's permission, so the child can practice at home with a familiar voice.
- For anxious clients, frame relaxation as a way to feel more able to face hard things, not a way out of them. Keep brave steps in the plan.
- Send the printable home with a short note so caregivers know the words and pictures you used.
Teachers
- Use the 3 to 5 minute version as a transition after recess, before tests or at the end of the day.
- Keep it seated and optional. A child who does not want to join can sit quietly or draw.
- Post the script cards by your calm corner. The calm down corner ideas guide has more ways to set one up.
- Teach the secret squeeze so kids have a tool they can use during a test without leaving their seat.
Parents and caregivers
- Bedtime is the easiest place to start. Read the script in a soft voice and let the ending drift into sleep.
- Do it together. Children love it when grown ups also scrunch their noses like bunnies.
- Keep it short on busy nights. One round of three body parts is better than skipping it.
- Use it after a hard moment has passed, not as a demand in the middle of a tantrum.
- Notice and praise practice: "I saw you do your turtle shoulders before the game. That was smart."
Cautions and when to check with a clinician
- Pain and injuries. Never squeeze a body part that is injured, painful, recently operated on or in a cast. Skip it and relax that area without tensing. Squeezes should never hurt. If something hurts, stop.
- Medical conditions. If a child has a muscle, joint or bone condition, chronic pain, a heart condition, frequent cramps or any other health concern, check with their doctor, physical therapist or occupational therapist before practicing PMR.
- Neck, back and feet. These areas cramp or strain most easily. Use very gentle squeezes, and skip the neck entirely for young children. The script above works the neck only lightly through the shoulders.
- Breath holding. Remind children to keep breathing during squeezes, especially children with asthma.
- Feeling worse, not better. If a child becomes more anxious, upset or uncomfortable during relaxation, stop, let them open their eyes, move around and talk. Offer a different tool, such as grounding or movement. Children who have experienced trauma may find closed eyes or lying down uncomfortable; let them choose their position and keep their eyes open.
- Not a replacement for treatment. PMR is a coping skill. If worry, anger, sleep trouble or physical complaints are frequent, intense or getting in the way of school, friends or family life, talk with your pediatrician, a school counselor or a licensed mental health professional.
In the US, if a child talks about wanting to die or hurting themselves, call or text 988 (the 988 Suicide and Crisis Lifeline) any time, day or night. You can also text HOME to 741741 to reach the Crisis Text Line. If someone is in immediate danger, call 911.
Common mistakes
- Squeezing too hard. Kids often go all out. Ask for half strength. Hard squeezes can strain muscles and make it harder to relax.
- Rushing the pauses. The release and pause are the point. If you rush from squeeze to squeeze, you have a workout, not a relaxation.
- Only teaching it in a crisis. Introducing PMR in the middle of a meltdown rarely works. Teach and practice it while calm.
- Doing it once. Like riding a bike, relaxation is a skill that grows with practice.
- Using it to avoid every fear. Relaxation should help a child face hard things, not replace facing them.
- Requiring eyes closed or silence. Make it an invitation. Pressure works against relaxing.
Making it fun: PMR activities and games
- Robot and rag doll. Call out "robot" for stiff, tight bodies and "rag doll" for floppy ones. Then slow it down, and end on rag doll.
- Spaghetti test. Gently lift a child's relaxed arm a few inches (with permission). Is it uncooked spaghetti (stiff) or cooked spaghetti (floppy)? Let them test yours too.
- Invent a squeeze. Kids create their own image for each body part and teach it to the group. Write them on the blank script card.
- Relax story. Read the script as a story, such as a day at the beach: squeeze a lemon for lemonade, curl toes in warm sand, hide like a turtle.
- Body map coloring. After practicing, children color where they felt tight in one color and where they feel calm in another.
- Calm word cards. Each child picks a calm word to think when they let go. It becomes a cue they can use anywhere.
Free progressive muscle relaxation printable for kids (PDF)
The free printable has three pages in US Letter size, written for kids about 5 to 12:
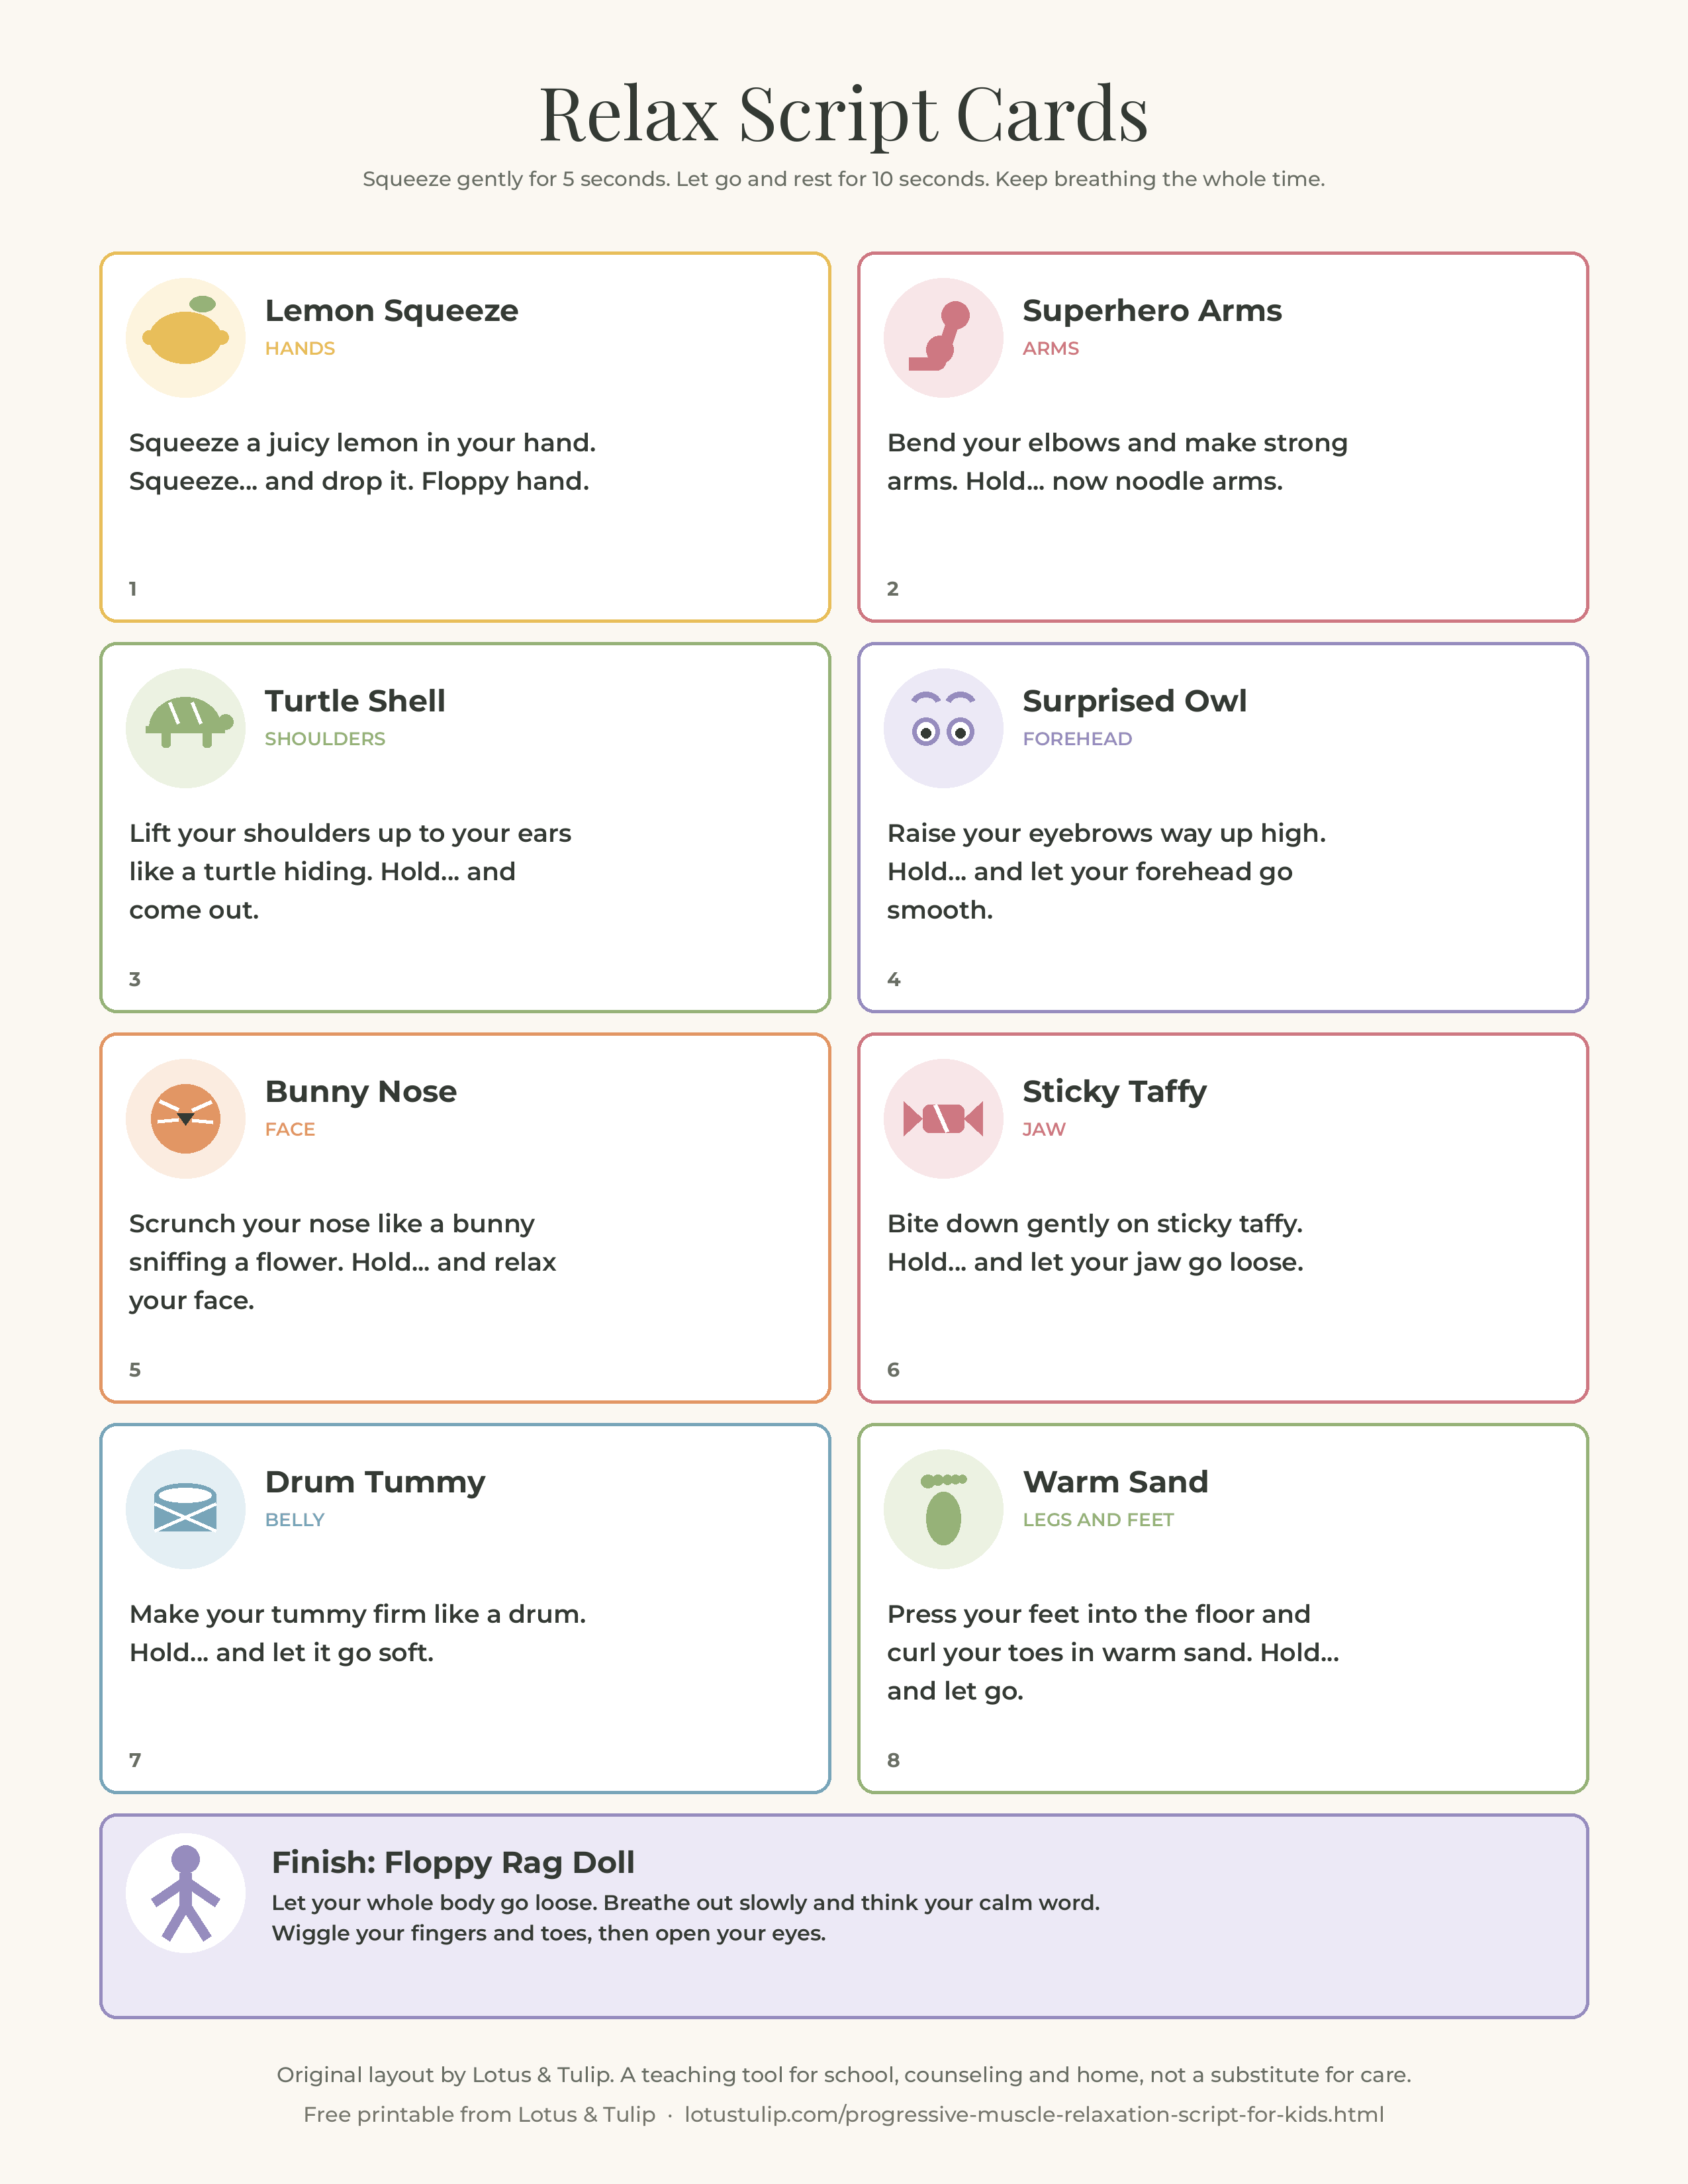
- Page 1: Relax Script Cards. Eight cut apart cards with the short read aloud lines for lemon squeeze, superhero arms, turtle shell, surprised owl, bunny nose, sticky taffy, gas pedal legs and warm sand toes, plus the rag doll ending. Great for a calm corner or a key ring.
- Page 2: My Relax Body Map. A simple body outline to color where tension shows up, a "when do I get tight?" checklist, a tight to loose rating and a space for the child's calm word.
- Page 3: Relax Practice Tracker. A two week tracker with before and after calm ratings, a "which version did I use?" column, a plan for when to use the secret squeeze and a note for grown ups with safety cautions and 988.
Download the free progressive muscle relaxation printable for kids (PDF, 3 pages, US Letter)
Prefer single images? Page 1: Relax Script Cards (PNG) · Page 2: My Relax Body Map (PNG) · Page 3: Relax Practice Tracker (PNG)
Free to print for your own use and for use with your own students, clients or children. Please link to this page rather than re-uploading the file.
Related resources
- Breathing exercises for kids (free printable)
- Mindfulness activities for kids (free printable)
- Anxiety worksheets for kids (free printable)
- 5 4 3 2 1 grounding worksheet (free printable)
- Coping skills list for kids (free printable)
- Calm down corner ideas (free printable)
- Sleep hygiene worksheet (free printable)
- Anger management activities for kids (free printable)
Sources
- Jacobson, E. (1929). Progressive Relaxation. University of Chicago Press. Second edition 1938.
- Jacobson, E. (1934). You Must Relax. Whittlesey House, McGraw-Hill.
- Wolpe, J. (1958). Psychotherapy by Reciprocal Inhibition. Stanford University Press.
- Bernstein, D. A., and Borkovec, T. D. (1973). Progressive Relaxation Training: A Manual for the Helping Professions. Research Press.
- Koeppen, A. S. (1974). Relaxation training for children. Elementary School Guidance and Counseling, 9, 14 to 21.
- Heide, F. J., and Borkovec, T. D. (1983). Relaxation induced anxiety: paradoxical anxiety enhancement due to relaxation training. Journal of Consulting and Clinical Psychology, 51(2), 171 to 182.
- Manzoni, G. M., Pagnini, F., Castelnuovo, G., and Molinari, E. (2008). Relaxation training for anxiety: a ten years systematic review with meta-analysis. BMC Psychiatry, 8, 41.
- Beidas, R. S., Benjamin, C. L., Puleo, C. M., Edmunds, J. M., and Kendall, P. C. (2010). Flexible applications of the Coping Cat program for anxious youth. Cognitive and Behavioral Practice, 17(2), 142 to 153.
- Peris, T. S., Compton, S. N., Kendall, P. C., et al. (2015). Trajectories of change in youth anxiety during cognitive behavior therapy. Journal of Consulting and Clinical Psychology, 83(2), 239 to 252.
- 988 Suicide and Crisis Lifeline, 988lifeline.org. Crisis Text Line, crisistextline.org.
Progressive muscle relaxation for kids: FAQ
What is progressive muscle relaxation for kids?
Progressive muscle relaxation (PMR) for kids is a calming skill where children gently squeeze one group of muscles for a few seconds, then let go and notice how the muscles feel when they are loose. They move through the body step by step, often using playful pictures like squeezing a lemon or hiding in a turtle shell. It helps children notice tension and relax their bodies.
How do you do progressive muscle relaxation with a child?
Have the child sit or lie comfortably, eyes open or closed. Guide them to gently squeeze one body part, such as the hands, for about 5 seconds at half strength while breathing normally, then release and rest for 10 to 15 seconds while noticing the difference. Move through arms, shoulders, face, jaw, back, belly, legs and feet, and finish with a whole body rag doll check.
What age can kids start progressive muscle relaxation?
Many children around 4 to 6 can enjoy a very short, playful version with 3 or 4 body parts and an adult modeling each squeeze. Children 7 and older can usually follow a full script, and children 10 to 12 can learn shorter versions to use on their own.
How long should a PMR session be for kids?
A full progressive muscle relaxation script for kids takes about 12 to 15 minutes. Once children know it, a 5 minute version with four big muscle groups works well, and a 1 minute "secret squeeze" can be used at a desk or before a test.
Does progressive muscle relaxation work for anxiety in children?
Relaxation training, including PMR, has been shown to reduce anxiety in many studies, mostly with adults. In child anxiety treatment, relaxation is usually taught as a supporting skill within cognitive behavioral therapy, where gradually facing fears and changing worried thoughts appear to drive most of the improvement. PMR is a helpful calm body tool, but a child with significant anxiety should also get a full plan from a qualified professional.
Is progressive muscle relaxation safe for kids?
For most children it is a low risk activity. Use gentle squeezes that never hurt, skip any injured or painful body part, remind children to keep breathing, and check with the child's doctor or therapist first if they have a medical, muscle or joint condition or chronic pain. Stop if a child feels more upset, and let them keep their eyes open.
Is this progressive muscle relaxation script for kids free?
Yes. The read aloud script on this page and the three page printable are free to use with your own students, clients or children. Please link to this page rather than re-uploading the file.